Wednesday, August 31, 2016
Monday, March 23, 2015
Pallet Pirate Ship
What do you get when you make a pirate ship out of pallets?...lots of splinteRRRRRRRRs!
.jpg)
After a little more creeping around the back of some local businesses, what I also like to call "quality time with my little brother", I ended up with a nice variety of pallets.
 I broke down the 2 largest pallets and used the 2 x 4's for a lot of the framing and structure. I removed the boards from the underside of the second largest pallet and used them to fill in the gaps on the top to create the floor of the ship. I had 2 slightly smaller pallets that I stood on their sides to make the walls. Then with a handful of power tools and steady stream of itunes radio, I put together a ship.
 I did have to purchase more wood for the project. That's when I tapped into one of my favorite project resources, the 70% off "damaged" wood bin at Home Depot. And as an added bonus, the purple stray paint they use to mark the discounted pieces adds a pop of color on my monochromatic ship. It also coordinates nicely with my free craigslist slide.
The only real purchases I made were for good quality hardware and the super cool plastic ship wheel and telescope (with attached compass).

.jpg)
I have a very small and odd shaped backyard. Over the years I have pondered on how to best utilize the space. One of my fence corners creates a very narrow triangle. I have often pictured a ship's bow at that spot. I have also wanted to jump on the pallet up-cycling craze. Shiver me timbers, an idea began to form.
Free pallets are everywhere. You can't search "free stuff" on craigslist without stumbling upon a pallet listing. And not all pallets are created equally. My pallet quest led me to the downtown area of the city I live in. Over the past couple years construction has been underway for all new government building. Such a major project must produce some serious pallets. And I hit the jackpot!!! Not only did they have many very large, substantial pallets, they were wanting to get rid of them ASAP. They offered to load them on a truck and deliver them to my house for free. They then turned down the tip I tried to insist on giving them. The crafting gods were smiling down at me!!!! I vowed to honor their woody gift with the best damn low budget pallet pirate ship that has ever sailed the suburban seas.
The only real purchases I made were for good quality hardware and the super cool plastic ship wheel and telescope (with attached compass).
Since these pictures were taken, I have added a pulley line from the house to the ship (to send supplies back and forth) and some decorative items, including a cast iron bell to signal the crew below deck. I have a lot of ideas for embellishments in the upcoming months. I'll keep you posted.
And to address the concern some feel about using potentially toxic pallets to make a play structure, I have weighed the risks and rewards. The ship is half pallet and half store bought wood...wood that is also chemically treated. If they were sleeping on it every night I would feel differently. But my kids have promised to not continuously lick the pirate ship...well, at least keep it to a minimum.
Friday, February 27, 2015
Valentine's Potty Box

Valentine's Potty Box:
Level of Difficulty: Easy
Material Used:
Small white trashcan (about $1 at Goodwill)
Large white plastic bowl (less than $1 at Goodwill)
Cardboard (a combination of an inadequate description on the part of USPS.com and a lapse of common sense on mine, I am the proud owner of 10 packs of 25 large board game sized flat-rate shipping boxes. Many of my crafts utilize this abundant resource)
Rectangular disposable plastic container (I had one in my recycling)
1-2 rolls of white duck Tape
Colored permanent markers
Scissors
Box Cutter (more useful than scissor for some cuts)
Craft Glue
Newspaper, a sharpened pencil and toilet paper (accessories)
Glitter Glue (optional)
Step 1: First tape the bowl on top of the plastic rectangular container. Then tape that to the upright trashcan. There will be a gap between the rectangle container and the trashcan. You can tape over the gap in the next step.

Step 2: Cover the outside of the containers with white duck tape. Use the tape to bridge the gap between the trashcan and plastic rectangle to form the tank and base of the toilet. Do not tape over the top of the bowl or trashcan.
Step 3: Cut toilet lid shape out of cardboard and cover in white duck tape. Secure the lid to the white bowl with a 1-2 inch piece of tape. It will act like a hinge to allow for the lid to open and close.
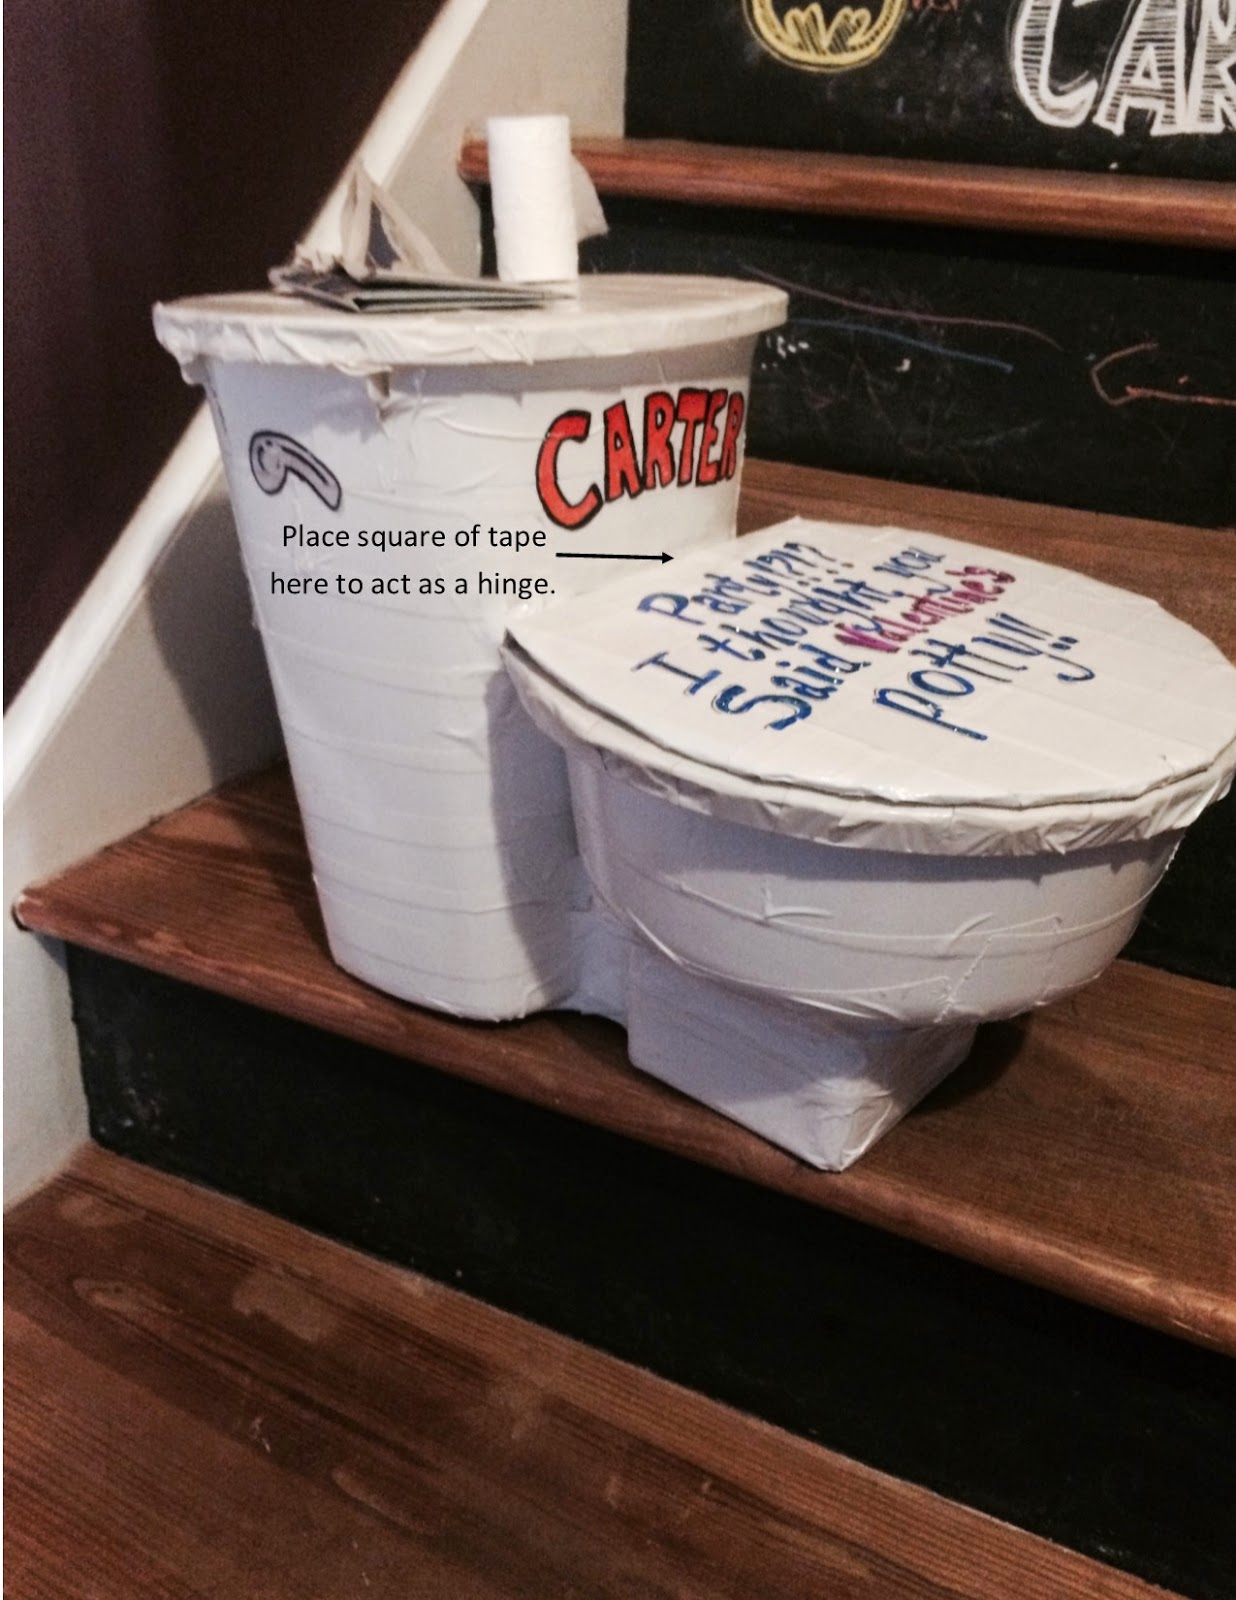
Step 4: Cut a piece of cardboard large enough to cover the top of the trashcan. Tape the cardboard to the top of the trashcan, covering the entire area with white duck tape.
Step 5: Using permanent marker, draw on flush handle and any other embellishments that you desire. I used glitter glue to outline the words I drew.

Step 6: Cut out a section of newspaper and glue it to the lid of the toilet (I used a part of the Sunday comics).
Step 7: Remove a long section of toilet paper, being careful to not pull the squares apart. Wrap the paper tightly around the pencil. Slide the roll half way off of the eraser side of the pencil. Using scissor, cut off the last third of the roll. This will create a smaller, scale size roll of toilet paper. Squeeze a small amount of glue into the center of the roll, securing it to the pencil. Once dry, punch the sharp end of the pencil into the lip of the trashcan tank.
Step 8: Prepare to continuously yell at your 3 1/2 year old because he want to use the new potty!!!!!!!
She's Crafty...And She's Just My Type
Hello, my name is Nikki. And I have a crafting problem. I
am the crafting McGyver. My favorite projects are the ones I make cheaply and
with the most random things. Garage sales, thrift stores, free stuff" on
craigslist...they are something epic waiting to be made. I'm always on the look out for items that can be re-purposed or up-cycled.
My "career" is in zoology. I currently work part-time in the education department of Zoo Atlanta. But with two young sons (3 1/2 & 6), my "job" is being a mom. One of my sons is on the Autism spectrum. I am often not able to financially or personally justify leaving my children in the care of others to go into work. Some people cope with everyday stress with exercise. Other's have a glass of wine. I choose to craft...while drinking a glass of wine (I'm a gifted multitasker).
My Mother-in-law, Linda, is my crafting enabler. She keeps me well stocked with all of the coolest craft gadgets. With all of my great toys, a born talent for creativity, and a complete lack of organizational and cleaning skills, I have made some really awesome things. My husband couldn't be more pleased (said with extreme sarcasm).
Subscribe to:
Comments (Atom)